Shooting creative portraits underwater can be quite a challenging task. I’ve summed up a couple tips and tricks that can help you get ready for your first couple experimentations in creative underwater portrait photography.
For those of you that want to try out underwater photography, chances are you’re not looking to spend thousands of dollars on an underwater housing. Luckily, there are alternatives out there that act as glorified plastic bags that are quite secure such as the DicaPac *** which can house a full frame DSLR and lens for only $75. Starter housings like the Ikelite
housings cost over $1500 body only and that’s just the beginning!
*** When purchasing any type of glorified plastic bag, I highly recommend you test it regularly by sealing it and putting in a sink/bathtub/toilet full of water to check for leaks. Manufacturers will not reimburse your camera if it leaks!

Myself holding a DicaPac somewhere in Malaysia
1. Water will affect your shot and your lighting!
Water affects your lighting. As you probably know, the deeper you go, the less light reaches your subject. On top of that, water acts as a massive filter that eats up the entire spectrum of reds… which means that your shots will get more and more blue as you go deeper. Depending on lighting conditions, you might want to stay as close to the surface of the water as possible to get the best skin tones and to keep your shutter speed from getting too slow! Additionally, the farther you are from your subject, the blurrier they will tend to become!
Keep all of this in mind when planning your shots!
2. Radio triggers don’t work underwater!
If you were planning on triggering surface strobes using radio triggers, think again. Radio waves unfortunately don’t travel through water which means that you’re limited to optical triggering using underwater strobes, or hoping that your flash+plastic bag combination is powerful enough to trigger strobes on the surface.
If you plan on triggering using the on camera flash, cover any part of the housing/bag directly in front of the internal flash with duct tape/gaffer tape to prevent backscatter from the internal flash that could ruin your image!
Alternatively, if you happen to be a little bit on the handy-side of things, look into this fabulous DIY solution
Alternatively, contact the folks over at The Underwater Realm and ask them for their lighting plans for their underwater LED lights!

Dave Reynolds, mastermind behind the Underwater Realm checks out his nifty underwater lights
3. Plan for time! Things take 3 times longer to happen… at least.
Normally takes you 30 minutes to nail a shot? Don’t count on it when playing underwater. Things take exponentially longer to happen when it’s happening underwater. Everything is more complicated: framing, focusing, breathing, directing, changing settings, moving lighting… and even worst, as the day gets on, you get tired and things get only harder!
4. Think oxygen & comfort!
It may sound stupid but things you take for granted such as breathing and staying warm don’t work the same way underwater as they do over water.
Best case scenario, get an entire scuba kit.
Worst case scenario, grab some fins to increase your mobility.
Also, staying in water for long periods of time gets uncomfortable quite quick so be sure to grab a full body wet suit. These small things that help keep you comfortable will help ensure that your mind stays more focused on creating the image you want to create.
Finally, be sure to bring snorkeling goggles over standard swimming goggles. Keeping water out of your nose will make your life so much more comfortable in the long run.
5. Beware the drowning face
Unfortunately, most people tend to look quite ugly as they strike glorious graceful poses underwater. Many a time, shots are ruined because of a missed expression. Before taking photos of your models, run them through the poses underwater making sure that they’re comfortable. Getting them to perform the same routine over and over again while your attention is 100% focused on their expression and not grabbing the shot will help both parties understand what needs to be done to pull off the perfect expression.
Alternatively, if you don’t want to deal with the drowning face, some amazing portraits can be created by simply cutting off/obscuring the heads of your models. Brooke Shaden does this quite often in her amazing underwater works (beware a lot of her stuff is NSFW).
6. Light floaty clothes and props are magical underwater
Light transparent cloth looks amazing underwater and adds a glorious sense of ethereal beauty to your imag
es and is great for helping you tell a story without drowning your models. Keep in mind that it will hinder your models movements which brings me to the last and final point…
Bringing props underwater will also make things even more surreal. Simple objects take on a whole new meaning underwater. Some ideas: guitar, chair, flowers…

Photo Credit: Renee Robyn Photography / Model: Madison Mah
7. Run through breathing and visualization techniques to help improve your shots
Speaking of drowning expressions, one thing that will greatly help you stay underwater longer and get a better expression is to perform a combination of visualization techniques and breathing exercises.
Surprisingly, it is not the lack of oxygen that triggers the urge for air after you hold your breath for very long but the body’s buildup of carbon dioxide. That can be controlled with a little practice.
8. Bring swim noodles and lead weights!
Swim noodlesare the perfect flotation device that are great to have so that your models don’t need to swim to the edge of the pool/lake/sea after every take. They’re long, bright, hard to loose and ridiculously useful.
Lead weightson the flip side can be useful for sinking your models rapidly if you happen to be in a deep environment so that they don’t waste time and energy to get to the bottom of the pool.
9. Prepare a safety person
I can’t stress how important this final point is. Having somebody standing by to get your model out of trouble if she tangles herself while you’re fiddling with the camera is absolutely critical. Water is dangerous and you always want to be sure that people are on hand just in case anything goes wrong.

Manly guy with the massive GATES underwater camera system is Richard Stevensen doing a practice filming run on the folks of the Underwater Realm
And finally, some inspiration from some great creative underwater photographers:
- Zena Holloway: http://www.zenaholloway.com/
- Elena Kalis: http://www.elenakalisphoto.com/
Did I miss anything? Please leave a comment!
And for those interested in seeing how I shot the Underwater Realm:
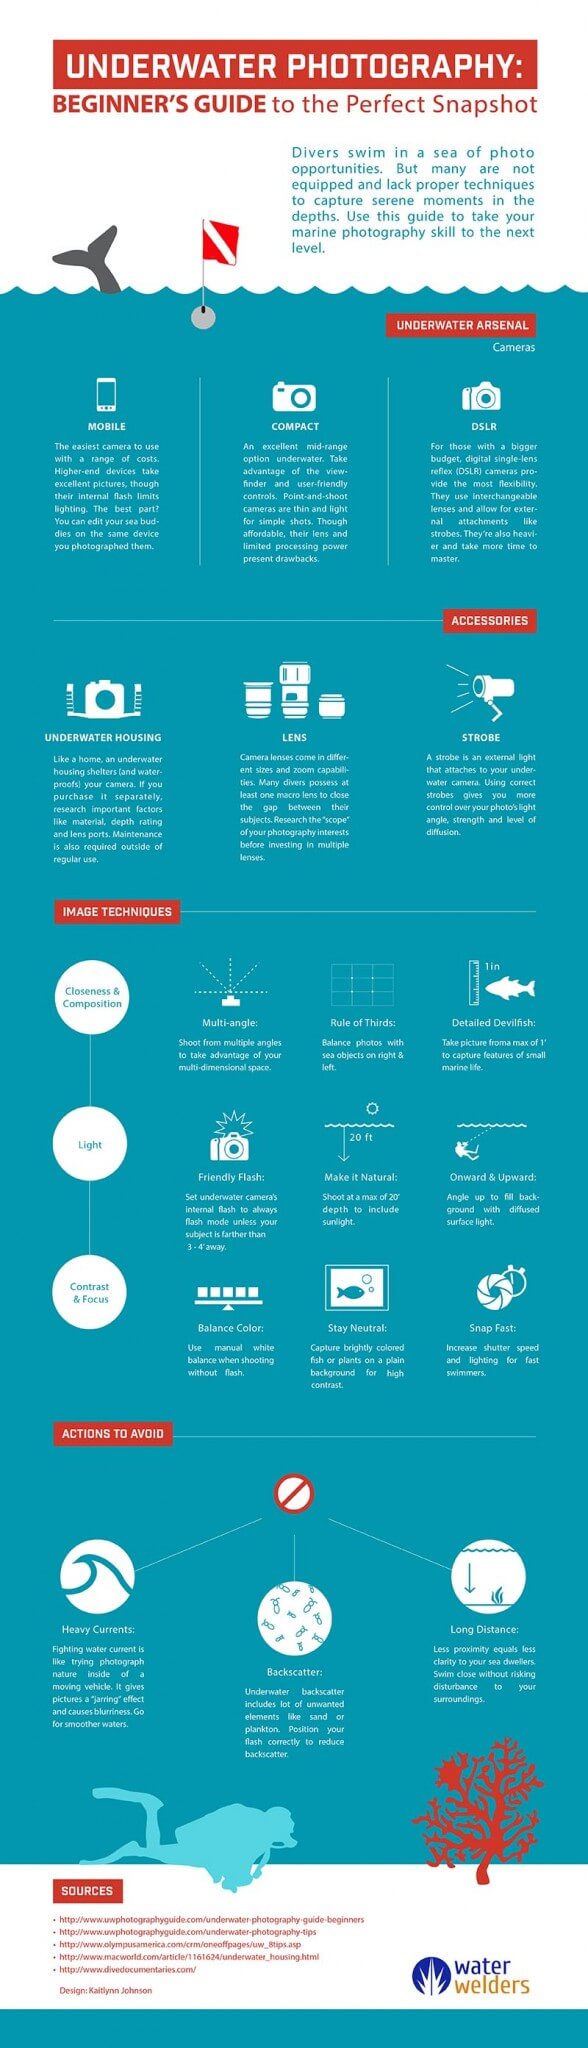
Beginners in underwater photography may benefit from Water Welders’ infographic. See infographic below.