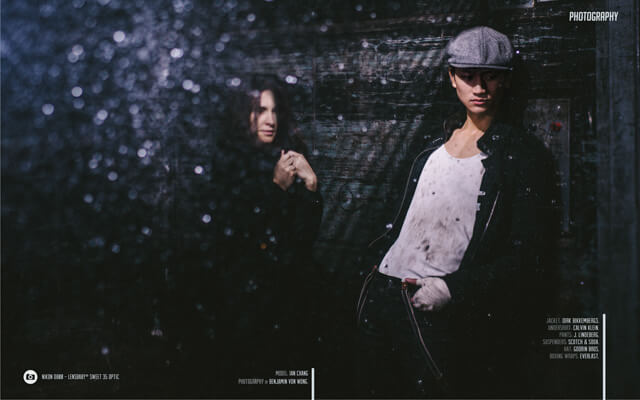
I’ve always wanted to create a rain machine, but never quite got around to making a proper rain rig out of pure impracticality. I don’t have a studio space and most (*cough* all) fancy places up for rent aren’t a huge fan of getting their space flooded with water…. which mean that even if I had come up with the motivation of creating a rain rig, I wouldn’t have a proper place to deploy it.
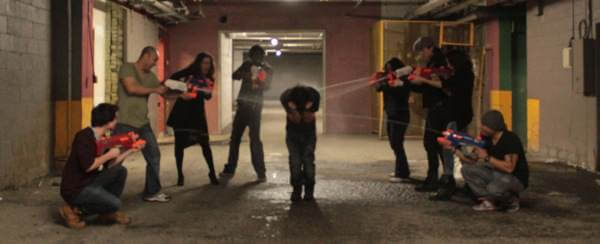
Enter the idea to use waterguns to create rain. They were light, portable, easy to clean up and easy to find. People weren’t terrified about the idea of having a watergun used in studio and it wouldn’t require any special setup. All I needed was a surface for the water to bounce off of and lo and behold, I’d have rain! (or something close enough.)
The main problem that I predicted would be that the rain would look two dimensional since the splash wouldn’t have much depth to it. The only solution I had was to either add more waterguns… or… use a tilt shift lens.
Luckily for me, Lensbaby had sent me a Lensbaby Composer Pro kit a couple months back including a Sweet 35 and Edge 80 lens to play with.
The results? Quite awesome. Check out the BTS:
The LensBaby experience… and a couple helpful tips I learned along the way
Using the LensBaby was a very interesting experience for me. Since it was entirely manual, it forced me to slow down and make sure everything was well composed, framed, tilted and focused before I could move on. Though this made the entire experience slightly frustrating as I am a ridiculously impatient person, the results, to me were entirely worth it.
Once focus was nailed in, the shots turned out to be surprisingly sharp. I had always considered the LensBaby more of a toy than a tool so I was quite pleasantly surprised to see that I was still able to come up with ridiculously sharp and crisp images as long as I paid very careful attention to my focus points. Combined with an extremely shallow depth of field and the variable effect from the spray of a watergun, this meant quite a lot of tries before getting the perfect shot. It also meant that the model was not allowed to do very much in terms of movements making the entire shoot experience quite challenging for all parties involved (my poor model was frozen solid by the end of the shoot!)
Here are a couple tips for anybody starting out with the LensBaby:
Tip#1: Shoot on a Tripod
To make sure that you get critical focus right, it is much easier to frame your subjects on a tripod and put all your energies into making sure that the lens baby effect is exactly how you want it. Having the camera stable on a tripod will ensure that you can put all your efforts and energies into getting that perfect tilt for the shot.
Tip#2: Use LiveView to help critical focus!
Missing the perfect shot because your focus was slightly off is the most frustrating thing ever. Even more so when the depth of field is only a couple microns thin because you got a crazy tilt happening in your lens baby. By setting your camera to Live View, you can zoom in to 200-300% and make sure that the eyes (or whatever you happen to be focusing on) look absolutely perfect.
Tip#3: Distance matters
Distance from your subject makes a huge difference when using the LensBaby kit. Especially the 35mm. Attempt to shoot something very very far away (think landscape) and it’ll look like your scenery is almost jumping into hyperspace. The best I’ve found for portraiture is to get as close as possible to your subjects so you don’t loose too much detail.
Tip#4: Models, don’t move!
Once you have everything more or less lined up, it’s critical for your model not to move so be sure to tell him/her to keep absolutely still! Slight body wavers means you’ll loose that perfect focus you had so carefully lined up!
The lighting setups:
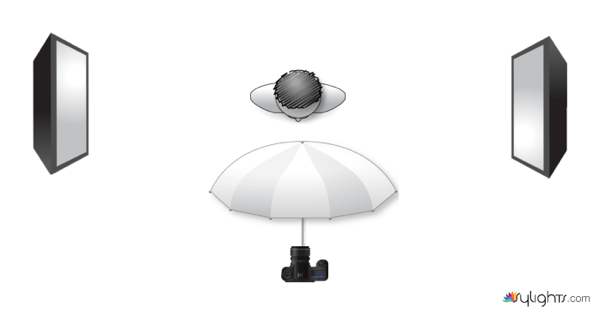
Shot 1:
The idea was to have a soft fill light bleeding into the image from high above to help light the top of Ian’s head as well as define his abs and pecs. The lights from the side would light up our water drops and cut Ian out from the backdrop. (note that the umbrella was actually boomed directly overhead.
Directly above, we had placed a couple massive reflectors for the water to bounce off of for a nifty rain effect.
Shot 2
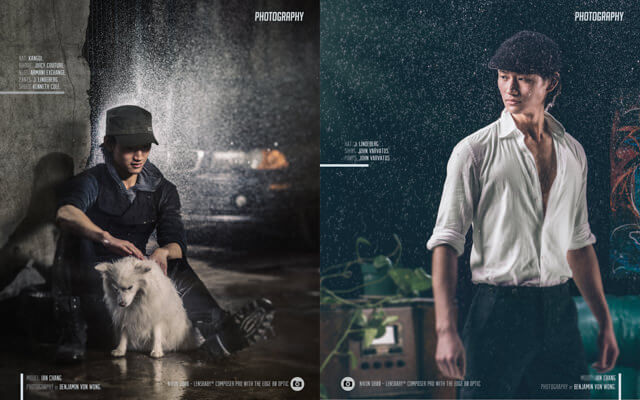
For the second image below (left), we had a small speed light hidden directly behind the pillar to light up that small hallo of light surrounding Ian. A second speedlight pointing a little in front of Ian lit the raindrops directly in front of him to produce that cute bokeh’ed set of raindrops and a main soft box boomed slightly above was our main fill light. To give a little bit of depth to the image, we also had an octobox hidden behind the pillar lighting up our car in the background. The idea – to create an image that looked like it was actually taking place outdoors and not in a parking garage.
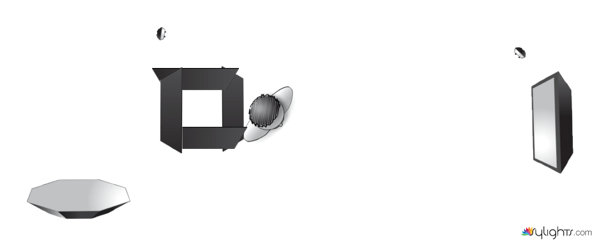
For the third image (right), the idea was to give the illusion that it was actually raining indoors. Lighting setup was pretty much similar to Shot 1 except that the side lights varied slightly in depth to give a more natural window light feeling to the entire image.
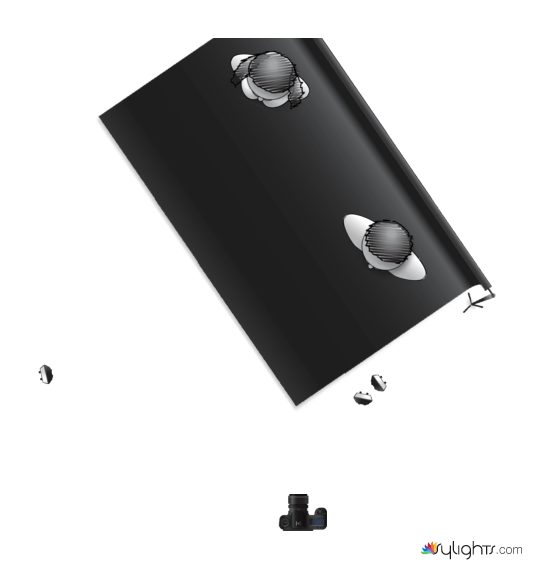
Shot 3:
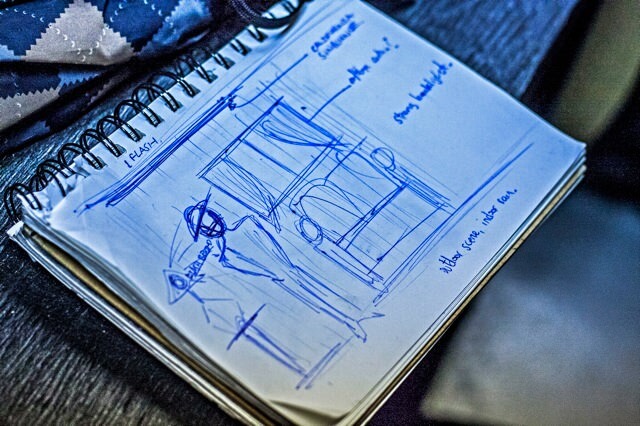
A shot I’m particularly proud of because I think the lighting in it just came out quite phenomenally. We actually rigged up a set of speed lights + Nasty Clamps
equipped with a set of PocketWizard FlexTT5s onto an elevator shaft door and set it straight up to create those crazy diagonal line shadows coming into the image. All that remained to add an extra strobe on the side to light up the water droplets streaming down from above.
Any questions? Please drop a comment!
Special thanks:
Credits:
- Renaud Lafrenière for the water guns
- Assist: Anick Morel, Renaud Lafrenière, Kaleena Jay, Anthony Phung, Nancy Patry, Julius Adarna
- Model: Nancy Patry, Ian Chang
- Video: Claudel Désir from Headbox Media
- Poster design: Emiliano Jabiu
Equipment used:
- Nikon D800E: B&H | Amazon
- Lensbaby Composer Pro B&H | Amazon
- Lensbaby Sweet 35 B&H | Amazon
- Lensbaby Edge 80 B&H | Amazon
- Pocketwizard Plus III B&H | Amazon
and TT5 B&H | Amazon - Sirui Tripod T2205X sponsored by LOVINPIX
- ThinkTank Airport International V2.0 (best bag ever) B&H
-
Disclaimer: Yes, these are affiliate links, and yes, these help support me if you do buy from them 🙂
Announcements:
- I’ll be in Vegas for a week from the 11th to the 18th! Leave me a note on Facebook or send me an email if you want to hang out!
- Are you a long time fan? Tell me about yourself and sign up for my newsletter! I answer each one personally and would love to get to know you! –> http://bit.ly/10ZAuOF
I will be giving a CRAZY 2.5 day workshop in London, UK on the 22/23/24th of March… Only five spots left! Check it out HERE


 by
by 